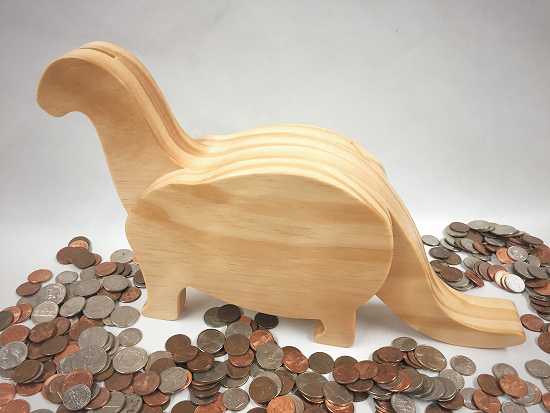
The Bronto Coin Bank makes a great gift for any child age 4 or above! Simple, clean design and classic all-wood construction gives this bank a lot of charm!
Kids will love dropping coins down into the Brontosaurus’ neck and it teaches them to save their money in a fun way. An access panel secured with two wood screws is hidden underneath the dinosaur’s belly and can be removed when the time comes to make a withdrawal!
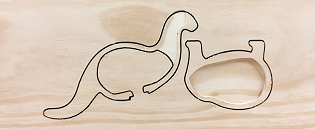
The project uses just the 1/16 Carving Bit and the 1/8 Cutting Bit. No other bits are required. The finished dimensions are about 14″ long x 3″ thick x 7.8″ tall.
ITEMS YOU WILL NEED
- Bits:
- 1/16 Carving Bit
- 1/8 Cutting Bit
- Boards needed:
- A_Side: 0.75″ x 11″ x 27″
- B_Side: 0.75″ x 11″ x 27″
- Other items needed:
- Two small wood screws #4 x 0.5″ long
- A piece of 0.125″ thick plywood about 1.875” x 1.5”
- Drill, wood glue, clamps, sandpaper, stain and/or paint, and clear finish
- Recommended Items:
- Pin nailer
- Belt sander
- Dremel-type rotary tool with assorted sanding wheels and bits to sand small details and speed up preparation for finishing.
STEP 1 – Upload Project
Open the Designer software and open the included project file(s). You can then simply compile (upload) the project(s) to your memory card.
When you compile, you may or may not get a pop-up window with an “Auto-Jig” warning message. If you do see the message, you may safely click on “Ignore” because our actual boards will be large enough that it won’t be an issue.
After the project is compiled, select “Normal or Best” for the File Quality setting. Click “OK” to upload to your memory card.
NOTE: Carve times are as follows:
NOTE: Carve times are as follows:
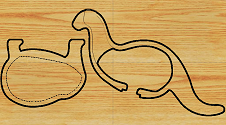
- A_Side_Bronto_Bank.mpc
- Best – 1 hours 17 mins
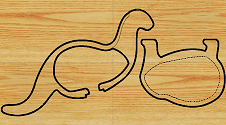
- B_Side_Bronto_Bank.mpc
- Best – 1 hours 17 mins
Take and insert the card into your machine and load the project board. Turn your machine on and proceed with Step 2…
STEP 2 – Carving
At the machine, follow the prompts to carve the project.
Once the carving is finished, remove it from the machine and vacuum or blow off any excess sawdust.
Load a new board and repeat the above steps for the B_Side_Bronto_Bank.mpc.
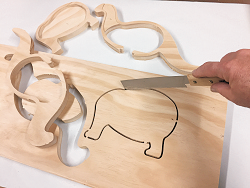
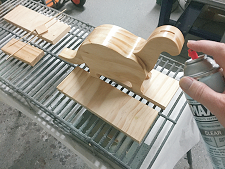
STEP 3 – Separate Parts from Material
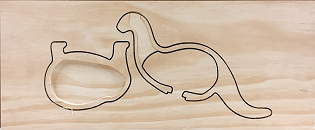
Now that the project is carved, you will need to separate all the pieces from the tabs using a sharp chisel. Label the A and B parts, then separate the parts from the boards. Sand off tabs and all undesirable toolmarks. Final sanding of the glued sections will be done after glue-up.
STEP 4 – Section Glue-up and Sanding
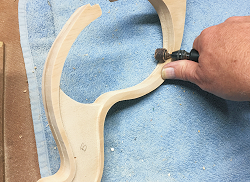
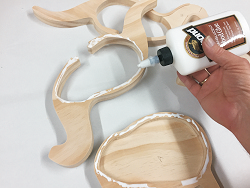
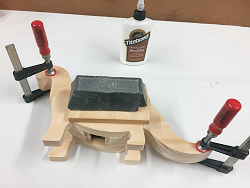
Lightly sand the flat parts of the sections so “fuzzies” won’t interfere with glue-up. Glue the two “A” sections together by spreading a thin, even layer of wood glue on the mating surfaces and stack align them together. Use a straight scrap board to make sure the feet and the tail are aligned. Use a pin nailer or CA glue to tack the parts in alignment. Then proceed to glue the two remaining “B” sections onto the “A” assembly. Clamp and/or weigh down until dry.

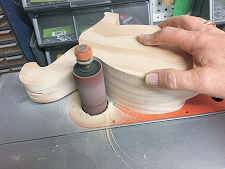
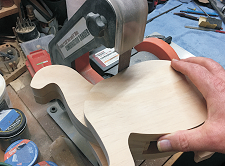
After the glue is dry, sand the sections to blend the seams. Use a coarse sandpaper to start, then move up to finer grits to yield a final, smooth finish. Sand all sharp edges slightly rounded, as well. I hand sanded with 150-grit progressively up to 220-grit, as well as using a spindle sander and small belt sander to speed up the process.
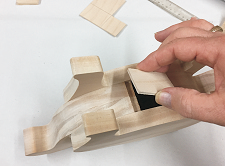
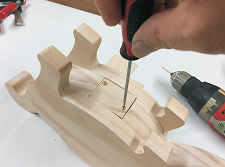
STEP 5 – Make the Coin Access Panel
Cut a panel of a 0.125″ plywood to fit the access hole (about 1.875″ long x 1.5″ wide). Place the panel onto the access area and drill two pilot holes diagonal from each other for the two #4 x 0.5 ” wood screws. Drive in the screws then remove the panel before applying finish.
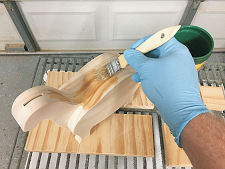
STEP 6 – Apply Finish
Apply your choice of finish. Here’s what I used on my Bronto Bank sample made from Select Pine:
- Two coats of thinned Zinsser Bulls Eye Seal Coat (50% denatured alcohol and 50% Seal Coat), sanding after each coat
- Several coats of gloss Krylon Clear Acrylic spray
FINAL
I hope you enjoyed making your “Bronto Bank” ! I chose to keep a natural wood finish, but my wife is suggesting I paint or stain it a green color (like the old Sinclair gas station dinosaur) or even a fuchsia color (like Barney the dinosaur). Another possibility: let the child you are gifting the bank to choose their own preferred color and maybe let him or her apply a finish to the dinosaur!
Happy Carving!